This was a "Newstar" remake of the Tamiya Harley Davidson and I knew the bike was going to be big by the size of the box & I was not wrong when I looked inside. After my initial pleasure, I noticed that all was not well. with closer look at the sprues I could see some very serious problems to come.
Some of the "chroming" had not worked on one of the sprues & faded to its natural black plastic colour, some of the other chrome parts were scratched & some other coated parts had either a lot of "flash" or obvious mould lines
 |
| Mould "flash" on some parts |
 |
| Poor Chrome effect on some parts |
My wife’s idea was do a bright and mad "Custom" paint job on the bike as it will allow me to remove all the seam lines & scratches & give a personal touch. A quick walk to a local Halfords & with Sarah's help we chose a metallic red for the main parts like the tank, mudguards, etc. and a dark copper & a pale gold scheme for the old chromed parts married to a black frame.
FRAME ASSEMBLY:- Parts 1,2 & 3
Please note the area marked to be removed to fit the rear foot rests later on. The only problem I had had was with part No.N8 that had a nasty seam line, so out came the sanding sticks & I decided to paint it the same colour as the frame.
 |
| Areas to be cut off and left on the frame |
 |
| Chain and rear suspension arm fitted |
As the engine covers (Part No. L4 & L16) were going to be re-painted I built these up & put them aside. I built the cylinder cases without the bolt detail or spark plugs, as this will go on after spraying. The crank case minus the cover & oil pump was assembled with seam lines removed ready for spraying. The crank case was done in Tamiya Metallic Grey, the cylinder head in Tamiya Chrome Silver & the rocker covers & case cover in Sovereign Gold.
 |
| Engine parts of 1/6 Harley painted |
 |
| Completed Harley engine block |
With using our chosen scheme, I sanded off the chrome from the drive train covers, primed and painted them in the Gold. The gearbox unit was painted in Metallic Grey & the piping fixed with a small amount of superglue.
 |
| Gearbox cover painted in Gold |
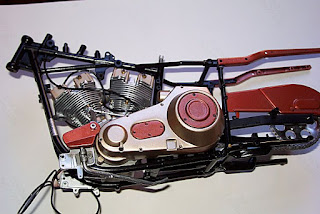
The decals were fixed on the frame & the engine mounted in place as well as the gearbox unit.
 |
| Engine and gearbox mounted in the frame |
STAGE 10
The sub assembly section in part 10 where the stand spring is fitted has a problem where no fixing hole has been drilled. I used a 0.3mm drill so that the spring hook would fit in the stand arm. The cover (G14) was painted in copper. I would fit this unit to the frame & attach parts L23 & L33 before fitting the gearbox cover assembly you made in stage 8 as the locating pin for part L23 will be obscured.
 |
| Fitted gearbox cover and piping |

No comments:
Post a Comment